When most of us get into backcountry skiing and snowboarding our minds are focused on the descent. We all dream of putting first tracks down wide open slopes in waist deep snow. What most people don’t realize is for those 10 minutes of turns it can takes hours of climbing. It is vital to know and choose the right route to safely ascend in the backcountry. Within the post below I put together some examples of things to look for during the day and some examples of routes that I would choose.
I’m not proud to say it but I was ski touring over 100 days a season for 15 years before I took any avalanche classes. When I did decided to get educated I was happy to find that I for the most part my mindset was spot on. The most vital thing to staying alive in the backcountry is OBSERVATION!!! Pay attention to the surrounding environment and it will let you know what is going on. Conditions change both day to day as well as throughout the season. Knowing what to expect is vital to being safe and this can be achieved through both classes and experience.
Make Your Own Avalanche Forecast Prediction
If you live near the mountains make your own avalanche forecast before looking it up online. I was fortunate to work as a hut warden at a place called Tamok in Northern Norway two years back. My job was to keep the place clean and I liked to give people a heads up on what to expect conditions wise. I would chat with Jarkko_Juhani Henttonen about what we thought the avalanche forecast would be online. Once we decided what we thought it was from type of avalanches to what aspects we would then look at the forecast. Most of the the time we were spot on but more importantly we were relying on our experience and senses. Though it is great to receive an avalanche forecast on your phone it is much better to know what to look for.
For most of my posts I try to write the text above the photos but for this post they will be below. The reason for this is that I want you to think and spot what the photo represents. It is like hiring a guide every time you ski tour. At first that is fine to help you learn but before long you are relying on them 100%. What started out as a great thing can quickly become a crutch.
What to Look for to Safely Ascend in the Backcountry
In the photo below we have an amazing landscape shot of the North Cascades of Washington State. Other than being a stunning photo from John Scurlock what main thing do you notice.
Click on the side arrows to reveal the answer
While there is accumulation on the upper slopes the lower trees are bare of snow. This is an obvious sign of where the snow level is/was when the storm came in. While the temperature can be below freezing in the valley below you won’t find powder conditions. It could also be the opposite where the temperature is rapidly rising and at the moment the snow is still in the trees. While for the most part a temperature lowering can be a good thing a rising temperature is incredibly dangerous. While skinning up a mountain pay attention to what the snow on the trees are doing.
If you see that the snow is falling off the trees the slopes around you are warming up and it can be a clear indicator of an avlanche cycle.
Another Thing to Focus on for Safely Ascending in the Backcountry
This photo showcases something that is vitally important for all sorts of snowpacks. While it is an issue in Maritime snowpacks it is way more dangerous in Continental Snowpacks.
Click on the side arrows to reveal the answer
While we dream of ski touring under clear skies it can create a massive problem within the snowpack. With clear, windless and cold nights the air pulls moisture out of the ground. Over time this moisture freezes and it creates crystals known as surface hoar. While a night of it can make things scary a week of this can turn the entire season into an avalanche nightmare. Surface hoar crystals while beautiful on top of the snowpack are incredibly dangerous once buried. Everyone has heard the Idiom of “the straw that broke the camels back”? Now imagine you are the straw and the camel’s back is a massive 5 foot deep avalanche. In Maritime snowpacks usually rain storms destroy the crystals from the weight of the snow and make all the layers turn into a single one. In a Continental snowpack the buried surface hoar crystals can be and usually are a persistent problem throughout the season.
When you are about to do a tour and want to ascend the backcountry safely then it is good to know what the forecast has been the past few days to weeks. Usually a pit dug out via hand or shovel will show the weak layers. While digging pits is a great topic to cover it needs to be its own post.
A Clear Sign of What to Expect or Fear while ascending
The photo below can be either your friend or your enemy. Other then being another great shot from John Scurlock what do you notice.
Click on the side arrows to reveal the answer
Wind transportation is something that is vital to understand in the backcountry. On the good side of things it can turn dust on crust into a great powder day. On the other end of the spectrum it is an indication for potential slabs as well as cornices. It is rare to have a storm come in without wind. You should always pay attention to what aspects are wind affected and wind loaded. This is vital if you want to safely ascend in the backcountry.
Below is a great example of what I am talking about and to see exactly what I mean click on the arrow
The photo above is looking at some north facing slopes in Mount Rainier National Park. If you look close enough you can see that the Northwest facing slopes are wind affected. Now looking to the Northeast slopes they look smooth. One can expect the NE aspects in the area to both ski better but also have a bigger potential for slabs. It is a delicate thing but vital to spot if you want to safely ascend in the backcountry.
The Terrifying Slab Avalanche
Usually a slab avalanche is caused by a mixture of wind loading and a weak bond with the snowpack. Up higher in the post I mentioned Surface Hoar Crystals. With the wind constantly loading the slopes and it usually being convex there is nothing to hold up the weight. While this happens in nature often it can easily be triggered by the weight of a skier. Slab avalanches can run across an entire slope or be an isolated pocket on an aspect. While a few inches doesn’t seem like it would be dangerous the amount quickly adds up. If you notice a slab avalanche went off on one north face there is a good chance the other north faces around are similarly unstable.
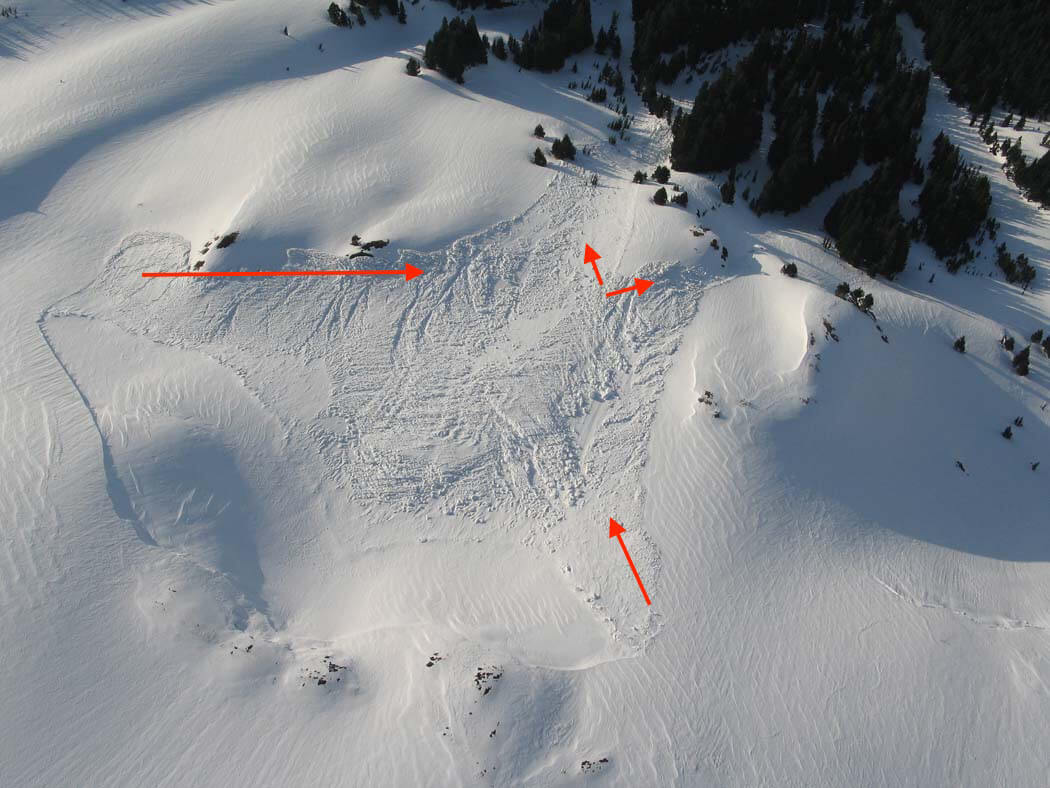
Why To Try to Avoid Gullies
Usually gullies have a clear path to the open slopes above. While being the easiest way to climb most of the time they should be avoided if there is avalanche terrain above. If and when an avalanche goes off these are the natural route for them to go down. Gullies are known as terrain traps because the snow quickly accumulates in them. What may not seem like a deep avalanche could be multiple feet deep if it is constricted to being in a ravine. In the photo below you can see the natural path of the avalanche. If someone was skinning up the creek they would be buried. In contrast someone heading up the ridge would be in a safe zone.
A Few Examples of Routes to Ascend in the Backcountry Safely
This is where I am sure people will start disagreeing with me. When you look at the face below what route would you choose to safely ascend to the summit.
Click on the side arrows to reveal the answer
If you clicked on the photo above you would see that I stuck to the trees. Though it is more direct on the open slopes they are obvious avalanche paths. Once on the upper alpine section I would stick to the low ridge before reaching the final high point. For the last few hundred feet the slopes mellowed out and the potential for slides would be off both the left or right sides. As for descending the slopes I will leave it to your imagination but would consider wind, temperatures and time of day.
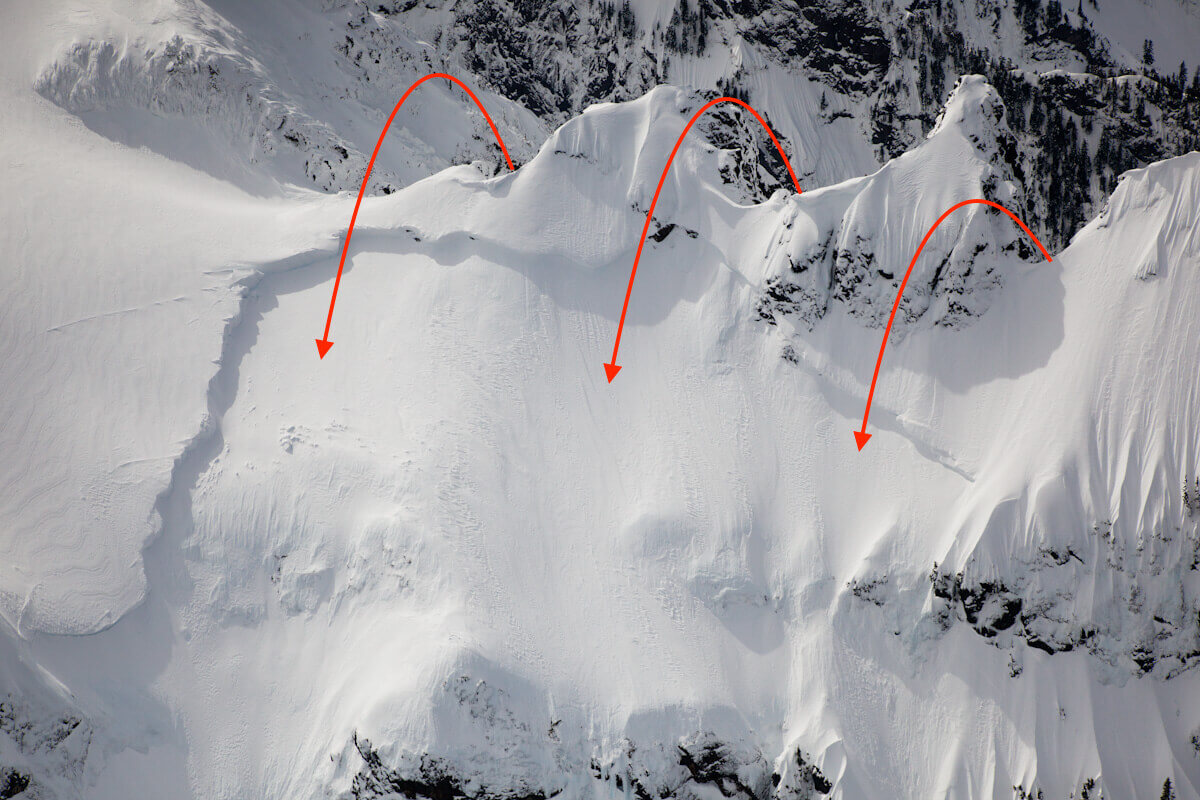
The Next Route to Ascend To Minimize Avalanche Exposure
Now things are getting a bit more complex and looking at the photo an ascent route isn’t so straight forward. While there are many different ways to head up Click on the side arrows to reveal my choice of route
The photo above is a north facing slope where you can see the Northeast ridge shows signs of wind loading. Being in the Cascade Mountains the area has predominant winds from the west. You can tell this because the North bowl has a massive avalanche swath running the entire slopes. You can expect that every so often (maybe every few years) there is a massive avalanche cycle. The snow builds up on the upper face until it can’t hold the weight anymore. Soon enough an avalanche runs the entirety of the North face to the valley below
Considering conditions I would head up via the Northwest trees. Though there would be a small section where there is exposure most of the route is clean. Once getting to the crux our group would cut across one at a time. After that the rest of the skin track is back in the trees all the way to the summit. For the descent it would all be conditions dependent.
A Not so Straight foreword route and Why
Below is one of those lines that is begging for tracks. Looking at the photo what route would you take to the summit? Once you’ve decided click on the side arrows to see the route I would take.
Though trees aren’t always the best indicators of safe routes they do help to anchor slopes. I chose the route with the most trees heading up to the ridge line. Once on the edge of the upper steep face I would transition to bootpacking for the rest of the slope before descending. One benefit of a skin track laid out in this style is numerous gullies would return to the uphill track. You could lap numerous different chutes off of one solidly put in skin track.
Why A Ridge Can be the Most Dangerous Part of A ski Tour
Looking at the photo below it is easy to see why ridges are incredibly dangerous. Because in the route above I mentioned tacking the ridge it is important to talk about cornices. If you are not sure why just click on the side arrows to see what I mean.
If you walked over to the edge of the slope to see what is below there is a good chance there was little holding you up. The thing is you could have no clue as it looks exactly like the surrounding slopes but in all actuality you are standing over a cliff. Sadly you hear about cornice breaks quite often. People usually put there guard down when they make it out of the avalanche terrain below. For me personally the ridges can be the scariest part. When climbing on a ridge it is incredibly important to stay far away from what you think is the edge.In the photo above you wouldn’t have a clue that you are standing on top of a 2,000 foot cliff until it was too late.
Minimizing Exposure Versus not being Exposed to Safely Ascend in the Backcountry
Usually once you get into the alpine or semi technical terrain it is impossibly to be completely on a safe route. The best thing to do is to accept the risk and MINIMIZE your exposure in numerous different ways. Take the photo below as an example.
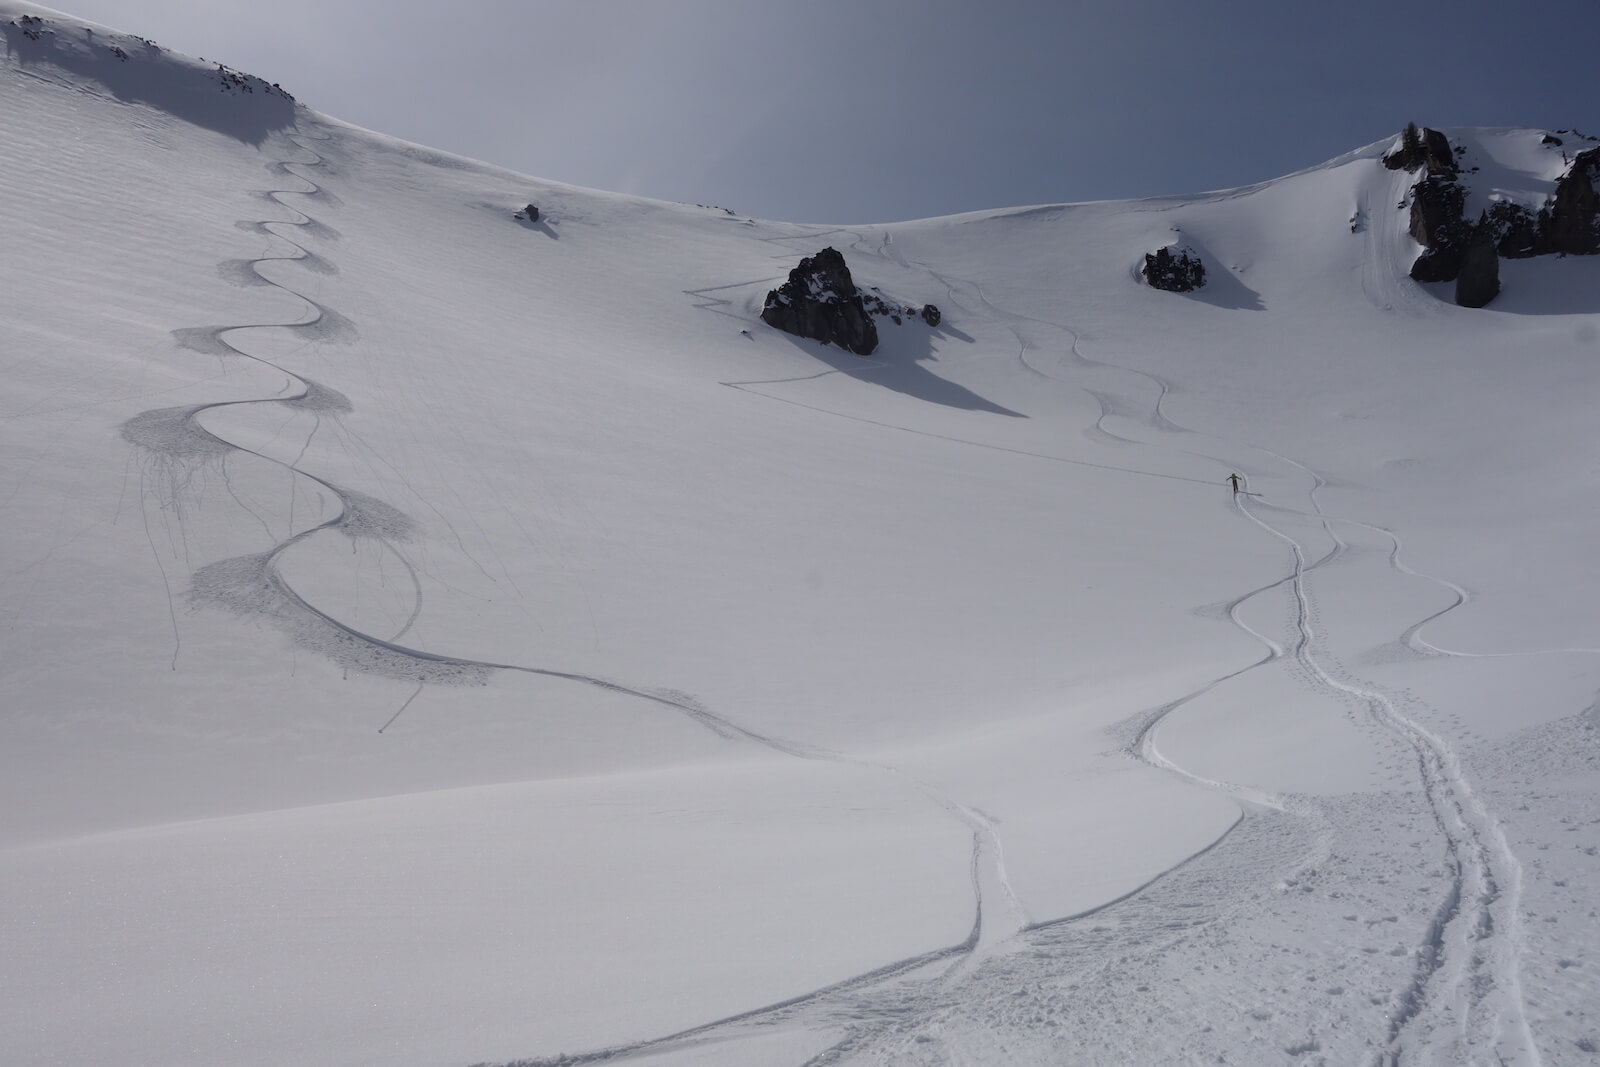
No matter what we did we were in wide open slopes. Putting in the skin track we worked with the terrain as best as we could. Using the rock as a spot to skin under and above if the slope slabbed off it would provide shelter from the debris. Upon the upper ridge we would climb to the low col which didn’t have a cornice. While putting in the skin track we made sure to keep a distance from one another. If someone did get caught in a slide the other two people would be in a safe spot and could visibly see them. Though we weren’t 100% safe from avalanches it was the best we could do with the terrain available.
Minimizing Exposure to Safely Ascend in the Backcountry
Sometimes you will find yourself on a route where there is a section where you will be exposed to avalanche routes. Before even climbing in the terrain I would want to have a safe avalanche forecast. Once you decided the ascent route click on the arrows to see what route I chose.
On this route there is no way to make it to the top without exposing yourself to avalanche danger. That being said it is best to minimize your time on the open faces. Though it would probably be harder to climb I would stick to the small ridges. If the face did break off I would be out of danger most of the time. Though the main gullies seem attractive they are terrain traps and should be avoided.
Saving the Best for Last.....Glacier Peak
The area below is one of those places where a broken binding can turn a fun day into a serious situation. With well over a day approach just to get into the terrain you need to play it safe. If you click on the arrows below I put a route up the mountain in the foreground as well as Glacier Peak. A few years back I actually climbed via the upper section on Glacier peak via this link here.
Like the post above no matter what there will usually be a bit of exposure to avalanche routes. Though it is something you want to avoid sometimes you have to go through them. The thing is to minimize your time as well as know what type of conditions to expect. If you are expecting slabs stay clear away from those aspects especially skinning up the swaths they drain down. If you look at the route up Glacier Peak you can notice that I took a mellow route pretty much to the top. I wanted as much flats between the upper headwall and me as possible. While not a perfect route in my opinion the extra low skin track minimizes exposure and allows me to safely ascend in the backcountry.
In Conclusion
It must be stressed that no specific route is perfect. Different conditions validate different ways to climb up a mountain. If it is late spring and hasn’t snowed for months an early morning climb up a gully is perfectly fine. Within this post I mainly focused on slabs and skin tracks but this is just a small piece of the ski touring puzzle. If you like what I wrote or know anyone who could find this info valuable please share it. Thank you for reading to the end and leave a comment below if you like it, have something to say or want me to cover another topic.
Huge thanks to Jason Hummel, John Sculock and Ben Starkey for there photos. Check out Jason’s Site for some awesome adventures and John Scurlock’s Site for some of the best aerial photos of the Cascades and what I used as a guide book for numerous years.
IF YOU KNOW OF GUIDING COMPANIES IN YOUR AREA LEAVE THEM IN THE COMMENTS BELLOW